مقدمه
با عرض سلام و وقت بخیر خدمت کاربران سایت پی وی لرن . و کاربرانی که دوره کامل آموزش برنامه نویسی اندروید را دنبال می کنند. Session در اندروید هنگامی که شما می خواهید داده های یک کاربر را در خارج از برنامه خود ذخیره کنید، به شما کمک می کند. تا زمانی که کاربر مجددا بخواهد از اپلیکیشن شما استفاده کند به راحتی اطلاعات خود را وارد کند. این کار به طرق مختلف قابل انجام است. اما ساده ترین و شایسته ترین روش انجام این کار از طریق تنظیمات Shared Preferences است. برای آشنایی با چگونگی کار با Session در برنامه نویسی اندروید در ادامه ی مباحث این بخش با ما همراه باشید.
Session در برنامه نویسی اندروید
در این مبحث به بررسی روال کلی کار با Session در اندروید و متدهای مربوطه می پردازیم.
همچنین در ادامه ی آموزش به یک مثال ساده از Session در برنامه نویسی اندروید پرداخته ایم.
کار با Shared Preferences
Shared Preferences شما را قادر به ذخیره و بازیابی اطلاعات در قالب کلیدی و ارزشی می کند.
برای استفاده از تنظیمات عمومی، باید یک متد () getSharedPreferences را به صورتی که در ادامه اشاره شده فراخوانی کنید:
مثال :
| SharedPreferences sharedpreferences = getSharedPreferences(MyPREFERENCES, Context.MODE_PRIVATE); |
با استفاده از کلاس SharedPreferences.Editor می توانید چیزی را در sharedpreferences ذخیره کنید.
اگر متد edit از نمونه SharedPreference را فراخوانی می کنید آن را در یک شی editor دریافت خواهید کرد:
مثال :
| Editor editor = sharedpreferences.edit(); editor.putString("key", "value"); editor.commit(); |
علاوه بر متد فوق متدهای دیگری از کلاس editor ارائه شده است که به شما اجازه ویرایش داده های shared preferences را می دهد، که به شرح زیر است:
| ردیف | متد و توضیحات مربوطه |
|---|
| ۱ | apply() این یک متد انتزاعی است. این تغییرات شما را از ویرایشگر به شیء به shared preferences که شما فراخوانی می کنید، اعمال می کند |
| ۲ | clear() تمام مقادیر را از editor پاک می کند. |
| ۳ | remove(String key) این مقداری که کلید آن به عنوان یک پارامتر منتقل می شود را حذف می کند. |
| ۴ | putLong(String key, long value) این یک مقدار long را در preference editor ذخیره می کند. |
| ۵ | putInt(String key, int value) این یک مقدار integer را در preference editor ذخیره می کند. |
| ۶ | putFloat(String key, float value) این یک مقدار float را در preference editor ذخیره می کند. |
مدیریت session از طریق shared preferences
برای انجام مدیریت session از shared preferences ، ما باید مقادیر یا اطلاعات ذخیره شده در shared preferences را در متد onResume بررسی کنیم.
اگر داده ای نداشته باشیم، برنامه را از ابتدا همانطور که تازه نصب شده است شروع می کنیم، اما اگر داده داریم از جایی که کاربر برنامه را ترک کرده شروع می کنیم.
مثال
مثال زیر طرز استفاده از Session در برنامه نویسی اندروید را که اجازه می دهد برای اولین بار کاربر وارد سیستم شود را نشان می دهد.
و پس از خارج شده از برنامه بدون logout ، اگر دوباره برنامه را شروع کنید، دوباره به همان محل بازگردانده می شوید.
اما اگر از برنامه خارج شوید، به صفحه ورود اصلی بازگردانده خواهید شد.
برای اجرای این برنامه شما می توانید از یک دستگاه اندروید واقعی و یا شبیه ساز اندروید استفاده کنید.
مراحل انجام کار:
| مراحل | تضیحات |
|---|
| ۱ | مراحل ایجاد برنامه در اندروید استدیو را طبق بخش های قبلی تحت عنوان پکیج com.example.Pvlearn.myapplication دنبال کنید. |
| ۲ | به محتوای فایل src/MainActivity.java f کدهای session را اضافه کنید. |
| ۳ | یک Activity با نام second.java.Edit برای افزودن کدهای session ایجاد کنید. |
| ۴ | طراحی مناسب با این برنامه را به res/layout/activity_main اضافه کنید. |
| ۵ | کدهای xml مشخص شده را به res/layout/activity_main اضافه کنید. |
| ۷ | برنامه را اجرا کنید تا شبیه ساز یا دستگاه اندروید شما نتیجه را نمایش دهد. |
محتوای فایل MainActivity.java:
مثال :
1 2 3 4 5 6 7 8 9 10 11 12 13 14 15 16 17 18 19 20 21 22 23 24 25 26 27 28 29 30 31 32 33 34 35 36 37 38 39 40 41 42 43 44 45 46 47 48 49 50 51 52 53 54 | package com.example.Pvlearn.myapplication; import android.content.Context; import android.content.Intent; import android.content.SharedPreferences; import android.os.Bundle; import android.support.v7.app.AppCompatActivity; import android.view.View; import android.widget.Button; import android.widget.EditText; public class MainActivity extends AppCompatActivity { EditText ed1,ed2,ed3; Button b1; Intent in; public static final String MyPREFERENCES = "MyPrefs" ; public static final String Name = "nameKey"; public static final String Phone = "phoneKey"; public static final String Email = "emailKey"; SharedPreferences sharedpreferences; @Override protected void onCreate(Bundle savedInstanceState) { super.onCreate(savedInstanceState); setContentView(R.layout.activity_main); ed1=(EditText)findViewById(R.id.editText); ed2=(EditText)findViewById(R.id.editText2); ed3=(EditText)findViewById(R.id.editText3); b1=(Button)findViewById(R.id.button); sharedpreferences = getSharedPreferences(MyPREFERENCES, Context.MODE_PRIVATE); b1.setOnClickListener(new View.OnClickListener() { @Override public void onClick(View v) { String n = ed1.getText().toString(); String ph = ed2.getText().toString(); String e = ed3.getText().toString(); SharedPreferences.Editor editor = sharedpreferences.edit(); editor.putString(Name, n); editor.putString(Phone, ph); editor.putString(Email, e); editor.commit(); in = new Intent(MainActivity.this,second_main.class); startActivity(in); } }); } } |
محتوای فایل second_main.java:
مثال :
1 2 3 4 5 6 7 8 9 10 11 12 13 14 15 16 17 18 19 20 21 22 23 24 25 26 27 28 29 30 31 32 33 | package com.example.Pvlearn.myapplication; import android.app.Activity; import android.content.Context; import android.content.SharedPreferences; import android.os.Bundle; import android.view.View; import android.widget.Button; public class second_main extends Activity { Button bu=null; Button bu2=null; @Override protected void onCreate(Bundle savedInstanceState) { super.onCreate(savedInstanceState); setContentView(R.layout.second_main); bu=(Button)findViewById(R.id.button2); bu2=(Button)findViewById(R.id.button3); } public void logout(View view){ SharedPreferences sharedpreferences = getSharedPreferences(MainActivity.MyPREFERENCES, Context.MODE_PRIVATE); SharedPreferences.Editor editor = sharedpreferences.edit(); editor.clear(); editor.commit(); } public void close(View view){ finish(); } } |
محتوای فایل activity_main.xml:
مثال :
1 2 3 4 5 6 7 8 9 10 11 12 13 14 15 16 17 18 19 20 21 22 23 24 25 26 27 28 29 30 31 32 33 34 35 36 37 38 39 40 41 42 43 44 45 46 47 48 49 50 51 52 53 54 55 56 57 58 59 60 61 62 63 64 65 66 67 68 69 70 71 | <?xml version="1.0" encoding="utf-8"?> <RelativeLayout xmlns:android="http://schemas.android.com/apk/res/android" xmlns:tools="http://schemas.android.com/tools" android:layout_width="match_parent" android:layout_height="match_parent" android:paddingLeft="@dimen/activity_horizontal_margin" android:paddingRight="@dimen/activity_horizontal_margin" android:paddingTop="@dimen/activity_vertical_margin" android:paddingBottom="@dimen/activity_vertical_margin" tools:context=".MainActivity"> <TextView android:layout_width="wrap_content" android:layout_height="wrap_content" android:text="Shared Preference" android:id="@+id/textView" android:layout_alignParentTop="true" android:layout_centerHorizontal="true" android:textSize="35dp" /> <TextView android:layout_width="wrap_content" android:layout_height="wrap_content" android:text="Pvlearn" android:id="@+id/textView2" android:layout_below="@+id/textView" android:layout_centerHorizontal="true" android:textSize="35dp" android:textColor="#ff16ff01" /> <EditText android:layout_width="wrap_content" android:layout_height="wrap_content" android:id="@+id/editText" android:layout_below="@+id/textView2" android:layout_marginTop="67dp" android:hint="Name" android:layout_alignParentRight="true" android:layout_alignParentEnd="true" android:layout_alignParentLeft="true" android:layout_alignParentStart="true" /> <EditText android:layout_width="wrap_content" android:layout_height="wrap_content" android:id="@+id/editText2" android:layout_below="@+id/editText" android:layout_alignParentLeft="true" android:layout_alignParentStart="true" android:layout_alignParentRight="true" android:layout_alignParentEnd="true" android:hint="Pass" /> <EditText android:layout_width="wrap_content" android:layout_height="wrap_content" android:id="@+id/editText3" android:layout_below="@+id/editText2" android:layout_alignParentLeft="true" android:layout_alignParentStart="true" android:layout_alignParentRight="true" android:layout_alignParentEnd="true" android:hint="Email" /> <Button android:layout_width="wrap_content" android:layout_height="wrap_content" android:text="login" android:id="@+id/button" android:layout_below="@+id/editText3" android:layout_centerHorizontal="true" android:layout_marginTop="50dp" /> </RelativeLayout> |
محتوای فایل second_main.xml:
مثال :
1 2 3 4 5 6 7 8 9 10 11 12 13 14 15 16 17 18 19 20 21 22 23 24 25 26 27 | <?xml version="1.0" encoding="utf-8"?> <RelativeLayout xmlns:android="http://schemas.android.com/apk/res/android" android:orientation="vertical" android:layout_width="match_parent" android:layout_height="match_parent"> <Button android:layout_width="wrap_content" android:layout_height="wrap_content" android:text="Logout" android:onClick="logout" android:id="@+id/button2" android:layout_gravity="center_horizontal" android:layout_alignParentTop="true" android:layout_centerHorizontal="true" android:layout_marginTop="191dp" /> <Button android:layout_width="wrap_content" android:layout_height="wrap_content" android:text="Close" android:onClick="close" android:id="@+id/button3" android:layout_below="@+id/button2" android:layout_centerHorizontal="true" android:layout_marginTop="69dp" /> </RelativeLayout> |
محتوای فایل Strings.xml:
مثال :
| <resources> <string name="app_name">My Application</string> </resources> |
محتوای فایل AndroidManifest.xml:
مثال :
1 2 3 4 5 6 7 8 9 10 11 12 13 14 15 16 17 18 19 20 21 22 23 24 25 | <?xml version="1.0" encoding="utf-8"?> <manifest xmlns:android="http://schemas.android.com/apk/res/android" package="com.example.Pvlearn.myapplication" > <application android:allowBackup="true" android:icon="@mipmap/ic_launcher" android:label="@string/app_name" android:theme="@style/AppTheme" > <activity android:name=".MainActivity" android:label="@string/app_name" > <intent-filter> <action android:name="android.intent.action.MAIN" /> <category android:name="android.intent.category.LAUNCHER" /> </intent-filter> </activity> <activity android:name=".second"></activity> </application> </manifest> |
اجرای برنامه
برای اجرای برنامه ی اندرویدی خود یکی از فایل های activity در برنامه ی خود کلیک کنید.
سپس روی نماد  (Run) از نوار ابزار برای شروع اجرای برنامه کلیک کنید.
صفحه اول این اپلیکیشن به صورت زیر ظاهر خواهد شد:
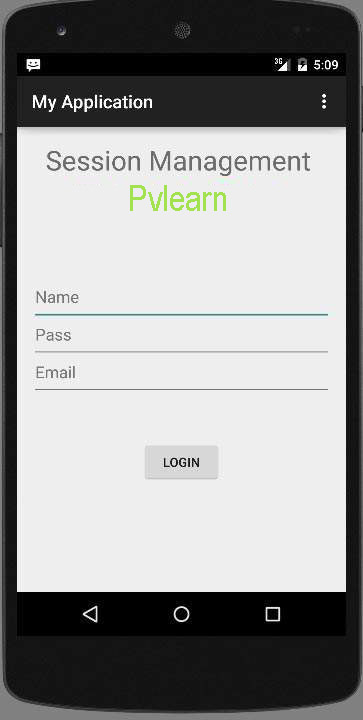
Session در برنامه نویسی اندروید
حالا فیلدهای برنامه از جمله نام کاربری و رمز عبور را تایپ کنید اما به خاطر داشته باشید که چه چیزی تایپ کردید.
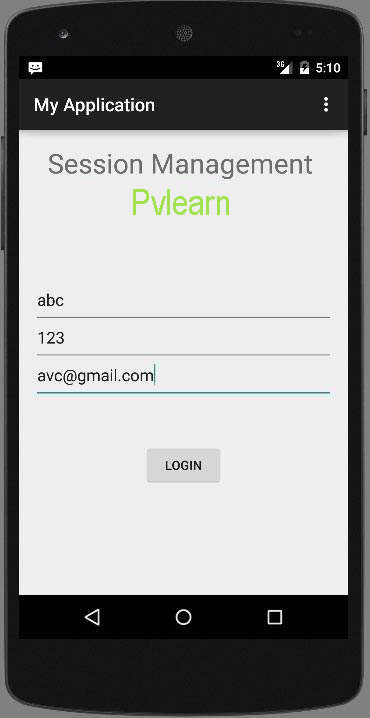
Session در اندروید -تایپ اطلاعات
به محض اینکه روی دکمه Login به سیستم کلیک کنید، به صفحه خوش آمد گویی هدایت می شوید.
در حال حاضر اطلاعات ورود شما در shared preferences ذخیره می شود.
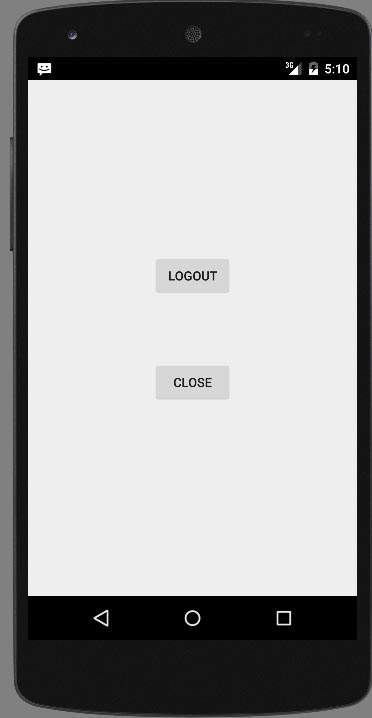
Session در اندروید -صفحه ی ورود
حالا از برنامه بدون logout کردن خارج شوید ، سپس به و شما به صفحه اصلی بازگردانده می شوید.
اطلاعات نیز به preference منتقل می شود.
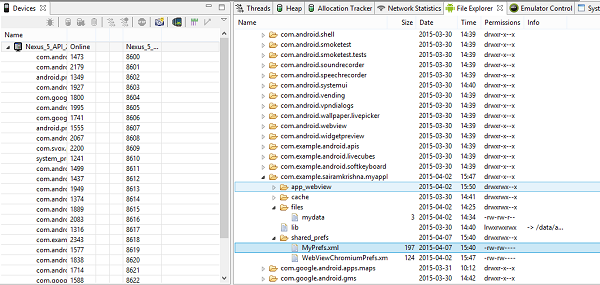
Session در برنامه نویسی اندروید -مشاهده جزئیات فایل preference
حالا اگر فایل myPref.xml با یک editor مانند notpad باز کنید، اطلاعات زیر را مشاهده خواهید کرد.
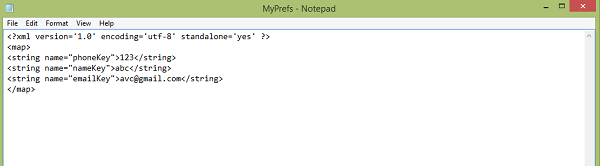
Session در اندروید -مشاهده فایل ذخیره شده
اگر بر روی دکمه logout کلیک کنید، مقادیر اولویت را پاک می شود و اگر مجددا اطلاعات ورود را وارد کنید در فایل XML ذخیره می شود.
کلام آخر
با استفاده از قابلیت Session در اندروید می توانید اطلاعاتی که کاربر هنگام ورود وارد می کند را در فایلی قرار داده تا در صورت خروج بدون logout کاربر بتواند به راحتی وارد اپلیکیشن شما شود.
در بخش بعدی به آموزش shared preferences خواهیم پرداخت.