مقدمه
با عرض سلام و وقت بخیر خدمت کاربران سایت پی وی لرن . و کاربرانی که دوره کامل آموزش برنامه نویسی اندروید را دنبال می کنند. Notification یا اطلاعیه در اندروید پیامی است که می توانید به کاربر خارج از UI(طراحی اصلی) معمولی برنامه خود نمایش دهید. هنگامی که شما به سیستم قابلیت صدور اطلاعیه را می دهید، Notification ابتدا به عنوان یک نماد در ناحیه اطلاع رسانی ظاهر می شود. سپس کاربر می توانید برای دیدن جزئیات Notification ، کشویی اطلاع رسانی را باز کند. هر دو ناحیه اطلاع رسانی و کشوی اطلاع رسانی، حوزه های کنترل شده سیستم هستند که کاربر می تواند در هر زمان Notification و جزئیات آن را مشاهده کند.ما مباحث این آموزش را به آشنایی با Notification در اندروید اختصاص داده ایم.
Notification در اندروید
در ادامه ی مباحث اطلاعیه در اندروید شما را با چگونگی ایجاد و پیاده سازی Notification در اندروید آشنا می کنیم.
کلاس Android Toast یک متد مفید برای نشان دادن Notification کاربران ارائه می دهد.
اما اطلاعیه ها پایدار نیستند و بعد از چند ثانیه که روی صفحه نمایش چشمک می زند ناپدید می شود.
Notification در اندروید
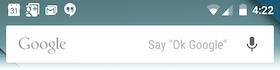
برای دیدن جزئیات یک اطلاعیه شما باید روی آیکون آن اطلاعیه واقع در بالای صفحه نمایش کلیک کنید.
و هنگام کار با شبیه ساز اندروید باید نوار وضعیت را برای گسترش اطلاعیه آن کلیک کنید.
سپس نتیجه چیزی شبیه تصویر زیر خواهد بود:
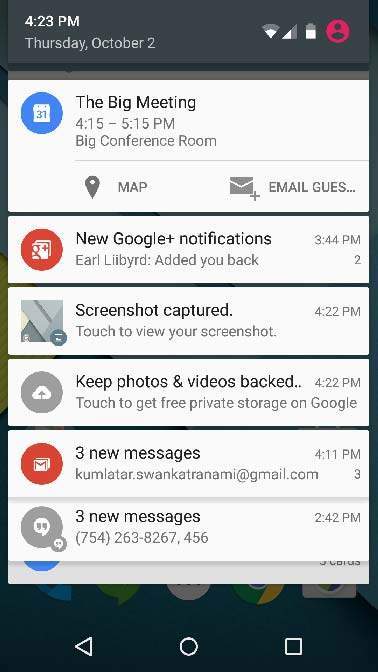
اطلاعیه در اندروید
فرم گسترش یافته ی فوق، می تواند یک Big View (نمایش بزرگ) داشته باشد که جزئیات بیشتری را در مورد اطلاعیه نمایش می دهد.
شما می توانید حداکثر شش خط اضافی را در هر اعلان اضافه کنید.
ایجاد و ارسال اطلاعیه در اندروید
راه ساده ای برای ایجاد اعلان وجود دارد. برای ایجاد یک اعلان، مراحل زیر را در برنامه خود دنبال کنید:
مرحله ۱ – ایجاد Notification Builder
اولین گام ایجاد یک notification builder با استفاده از ()NotificationCompat.Builder.build است.
از Notification Builder برای تنظیم خواص مختلف آگاه سازی مانند آیکون های کوچک و بزرگ، عنوان، اولویت و… استفاده می شود:
مثال :
| NotificationCompat.Builder mBuilder = new NotificationCompat.Builder(this) |
مرحله ۲- تنظیم ویژگی های notification builder
هنگامی که شما شیء Builder را دارید، می توانید خواص اطلاعیه آن را با استفاده از Builder به صورت مورد نیاز خود تنظیم کنید.
برای شروع باید با سه متد زیر جهت ایجاد اطلاعیه آشنا شوید:
- () setSmallIcon : برای ایجاد یک آیکون کوچک استفاده می شود.
- () setContentTitle : برای ایجاد یک عنوان استفاده می شود.
- () setContentText : برای ایجاد متن اطلاعیه استفاده می شود.
پیاده سازی متدهای فوق:
مثال :
| mBuilder.setSmallIcon(R.drawable.notification_icon); mBuilder.setContentTitle("Notification Alert, Click Me!"); mBuilder.setContentText("Hi, This is Android Notification Detail!"); |
مرحله ۳ – الحاق action (عمل)
این قسمت اختیاری است و اگر می خواهید یک اطلاعیه را با یک اطلاعیه دیگر پیوست کنید، لازم می شود.
یک action به کاربر امکان می دهد تا از طریق اطلاعیه به یک Activity در برنامه ی شما دسترسی پیدا کند.
این action توسط یک PendingIntent که حاوی یک درخواست است که فعالیت شما را در برنامه شما شروع می کند تعریف شده است.
. برای ارتباط PendingIntent با یک gesture، متد مناسب NotificationCompat.Builder را فراخوانی کنید.
به عنوان مثال اگر می خواهید کاربر هنگامی که روی اطلاعیه در کشوی اعلان کلیک می کند. فعالیتی آغاز شود PendingIntent را به فراخوانی ()setContentIntent اضافه کنید.
یک شیء PendingIntent به شما کمک می کند که یک action را روی یک طرف اپلیکیشن خود اجرا کنید.
ما از شیء stack builder برای ایجاد یک پشته ی مصنوعی در ابتدای Activity ایجاد می کند کمک می گیریم.
اینکار بازگشت به عقب را به صفحه اصلی برنامه ی شما تضمین می کند.
مثال :
| Intent resultIntent = new Intent(this, ResultActivity.class); TaskStackBuilder stackBuilder = TaskStackBuilder.create(this); stackBuilder.addParentStack(ResultActivity.class); // Adds the Intent that starts the Activity to the top of the stack stackBuilder.addNextIntent(resultIntent); PendingIntent resultPendingIntent = stackBuilder.getPendingIntent(0,PendingIntent.FLAG_UPDATE_CURRENT); mBuilder.setContentIntent(resultPendingIntent); |
مرحله ۴- رفع اطلاعیه
در نهایت شما می توانید آبجکت اطلاعیه را با فراخوانی () NotificationManager.notify به سیستم ارجاع دهید.
حتما متد () NotificationCompat.Builder.build را روی شیء builder قبل از اطلاعیه آن اعمال کنید.
این متد ترکیبی از تمام گزینه هایی است که یک شیء جدید Notification را باز می گرداند.
مثال :
| NotificationManager mNotificationManager = (NotificationManager) getSystemService(Context.NOTIFICATION_SERVICE); // notificationID allows you to update the notification later on. mNotificationManager.notify(notificationID, mBuilder.build()); |
کلاس NotificationCompat.Builder
کلاس NotificationCompat.Builder امکان کنترل ساده ی تمام flag ها و ایجاد طرح های Notification معمولی را می دهد.
بعضی از متد های مهم و اغلب استفاده شده به عنوان بخشی از کلاس NotificationCompat.Builder در دسترس هستند:
| ردیف | متد و توضیحات |
|---|
| ۱ | Notification build()تمام گزینه های تنظیم شده را ترکیب کرده و یک شیء Notification جدید ایجاد می کند. |
| ۲ | NotificationCompat.Builder setAutoCancel (boolean autoCancel)تنظیم این flag یک Notification را به طور اتوماتیک وقتیکه کاربر در پنل کلیک کند کنسل می کند. |
| ۳ | NotificationCompat.Builder setContent (RemoteViews views)یک RemoteView سفارشی را به جای یک استاندارد استفاده می کند. |
| ۴ | NotificationCompat.Builder setContentInfo (CharSequence info)یک متن بزرگ را در سمت راست اعلان تنظیم می کند. |
| ۵ | NotificationCompat.Builder setContentIntent (PendingIntent intent)زمانیکه روی کلیک می کنید یک PendingIntent را ارسال می کند. |
| ۶ | NotificationCompat.Builder setContentText (CharSequence text)متن (ردیفnotification دوم) اعلان را در یک اعلان استاندارد تنظیم می کند. |
| ۷ | NotificationCompat.Builder setContentTitle (CharSequence title)متن (ردیف اول) اعلان را در یک اعلان استاندارد تنظیم می کند. |
| ۸ | NotificationCompat.Builder setDefaults (int defaults)گزینه های notification پیش فرض را که استفاده می شود تنظیم کنید. |
| ۹ | NotificationCompat.Builder setLargeIcon (Bitmap icon)نماد بزرگ را که در تیکر و notification نشان داده شده تنظیم می کند. |
| ۱۰ | NotificationCompat.Builder setNumber (int number)شماره بزرگ را در سمت راست notification تنظیم می کند.. |
| ۱۱ | NotificationCompat.Builder setOngoing (boolean ongoing)تعیین اینکه آیا این یک notification در حال انجام است یا خیر |
| ۱۲ | NotificationCompat.Builder setSmallIcon (int icon)نماد کوچک را برای استفاده در طرح های notification تنظیم می کند. |
| ۱۳ | NotificationCompat.Builder setStyle (NotificationCompat.Style style)یک Style اطلاعیه غنی را در زمان ساخت اعمال می کند. |
| ۱۴ | NotificationCompat.Builder setTicker (CharSequence tickerText)هنگامی که notification برای اولین بار وارد شود، متن را که در نوار وضعیت نمایش داده شده تنظیم می کند. |
| ۱۵ | NotificationCompat.Builder setVibrate (long[] pattern)vibration pattern را برای استفاده تنظیم می کند. |
| ۱۶ | NotificationCompat.Builder setWhen (long when)زمان وقوع رویداد را تنظیم می کند. اطلاعیه ها در پانل به این زمان مرتب می کند. |
مثال
مثال زیر قابلیت notification اندروید که با استفاده از کلاس NotificationCompat.Builder قابل استفاده است را نشان می دهد:
| مراحل | توضیحات |
|---|
| ۱ | مراحل ایجاد برنامه در اندروید استدیو را طبق بخش های قبلی دنبال کرده و نام پکیج را com.pvlearn.pvlearn.myapplication قرار بدهید. |
| ۲ | به محتوای فایل src / MainActivity.java کد (“”) notify را اضافه کنید. |
| ۳ | ایجاد فایل src / NotificationView.java جدید برای نمایش طرح به عنوان بخشی از یک فعالیت جدید. |
| ۴ | طرح res / layout / activity_main.xml را برای افزودن دکمه ی Notification ویرایش کنید. |
| ۵ | یک فایل طراحی جدید به صورت XML res / layout / notification.xml ایجاد کنید. |
| ۶ | ثابت های رشته ای را بدون تغییر رها کنید. |
| ۷ | برنامه را اجرا کنید تا شبیه ساز اندروید نتیجه را نمایش دهد. |
محتوای فایل src / com.example.notificationdemo / MainActivity.java بصورت زیر است:
مثال :
1 2 3 4 5 6 7 8 9 10 11 12 13 14 15 16 17 18 19 20 21 22 23 24 25 26 27 28 29 30 31 32 33 34 35 36 37 38 39 40 41 42 43 44 45 | package com.example.notificationdemo; import android.app.Activity; import android.app.NotificationManager; import android.app.PendingIntent; import android.content.Context; import android.content.Intent; import android.support.v4.app.NotificationCompat; import android.os.Bundle; import android.view.View; import android.widget.Button; public class MainActivity extends Activity { Button b1; @Override protected void onCreate(Bundle savedInstanceState) { super.onCreate(savedInstanceState); setContentView(R.layout.activity_main); b1 = (Button)findViewById(R.id.button); b1.setOnClickListener(new View.OnClickListener() { @Override public void onClick(View v) { addNotification(); } }); } private void addNotification() { NotificationCompat.Builder builder = new NotificationCompat.Builder(this) .setSmallIcon(R.drawable.abc) .setContentTitle("Notifications Example") .setContentText("This is a test notification"); Intent notificationIntent = new Intent(this, MainActivity.class); PendingIntent contentIntent = PendingIntent.getActivity(this, 0, notificationIntent, PendingIntent.FLAG_UPDATE_CURRENT); builder.setContentIntent(contentIntent); // Add as notification NotificationManager manager = (NotificationManager) getSystemService(Context.NOTIFICATION_SERVICE); manager.notify(0, builder.build()); } } |
محتوای فایل res/layout/notification.xml بصورت زیر خواهد بود:
مثال :
| <?xml version="1.0" encoding="utf-8"?> <LinearLayout xmlns:android="http://schemas.android.com/apk/res/android" android:orientation="vertical" android:layout_width="fill_parent" android:layout_height="fill_parent" > <TextView android:layout_width="fill_parent" android:layout_height="400dp" android:text="Hi, Your Detailed notification view goes here...." /> </LinearLayout> |
محتوای فایل main activity که ویرایش شده در src / com.example.notificationdemo / MainActivity.java بصورت زیر است:
مثال :
| package com.example.notificationdemo; import android.os.Bundle; import android.app.Activity; public class NotificationView extends Activity{ @Override public void onCreate(Bundle savedInstanceState){ super.onCreate(savedInstanceState); setContentView(R.layout.notification); } } |
محتوای فایل res/layout/activity_main.xml نیز به این صورت است:
مثال :
1 2 3 4 5 6 7 8 9 10 11 12 13 14 15 16 17 18 19 20 21 22 23 24 25 26 27 28 29 30 31 32 33 34 35 36 37 38 39 40 41 42 43 44 45 46 47 48 49 | <RelativeLayout xmlns:android="http://schemas.android.com/apk/res/android" xmlns:tools="http://schemas.android.com/tools" android:layout_width="match_parent" android:layout_height="match_parent" android:paddingBottom="@dimen/activity_vertical_margin" android:paddingLeft="@dimen/activity_horizontal_margin" android:paddingRight="@dimen/activity_horizontal_margin" android:paddingTop="@dimen/activity_vertical_margin" tools:context="MainActivity"> <TextView android:id="@+id/textView1" android:layout_width="wrap_content" android:layout_height="wrap_content" android:text="Notification Example" android:layout_alignParentTop="true" android:layout_centerHorizontal="true" android:textSize="30dp" /> <TextView android:id="@+id/textView2" android:layout_width="wrap_content" android:layout_height="wrap_content" android:text="Tutorials point " android:textColor="#ff87ff09" android:textSize="30dp" android:layout_below="@+id/textView1" android:layout_centerHorizontal="true" android:layout_marginTop="48dp" /> <ImageButton android:layout_width="wrap_content" android:layout_height="wrap_content" android:id="@+id/imageButton" android:src="@drawable/abc" android:layout_below="@+id/textView2" android:layout_centerHorizontal="true" android:layout_marginTop="42dp" /> <Button android:layout_width="wrap_content" android:layout_height="wrap_content" android:text="Notification" android:id="@+id/button" android:layout_marginTop="62dp" android:layout_below="@+id/imageButton" android:layout_centerHorizontal="true" /> </RelativeLayout> |
در محتوای فایل res/values/strings.xml دو ثابت به صورت زیر تعریف می کنیم:
مثال :
| <?xml version="1.0" encoding="utf-8"?> <resources> <string name="action_settings">Settings</string> <string name="app_name">tutorialspoint </string> </resources> |
محتوای پیش فرض فایل AndroidManifest.xml بصورت زیر خواهد بود:
مثال :
1 2 3 4 5 6 7 8 9 10 11 12 13 14 15 16 17 18 19 20 21 22 23 24 25 26 27 28 29 30 31 | <?xml version="1.0" encoding="utf-8"?> <manifest xmlns:android="http://schemas.android.com/apk/res/android" package="com.example.notificationdemo" > <application android:allowBackup="true" android:icon="@drawable/ic_launcher" android:label="@string/app_name" android:theme="@style/AppTheme" > <activity android:name="com.example.notificationdemo.MainActivity" android:label="@string/app_name" > <intent-filter> <action android:name="android.intent.action.MAIN" /> <category android:name="android.intent.category.LAUNCHER" /> </intent-filter> </activity> <activity android:name=".NotificationView" android:label="Details of notification" android:parentActivityName=".MainActivity"> <meta-data android:name="android.support.PARENT_ACTIVITY" android:value=".MainActivity"/> </activity> </application> </manifest> |
اجرای برنامه
برای اجرای برنامه ی اندرویدی خود یکی از فایل های activity در برنامه ی خود کلیک کنید.
سپس روی نماد  (Run) از نوار ابزار برای شروع اجرای برنامه کلیک کنید.
اگر همه چیز بخوبی پیش برود شبیه ساز اندروید پنجره ی زیر را نمایش خواهد داد:
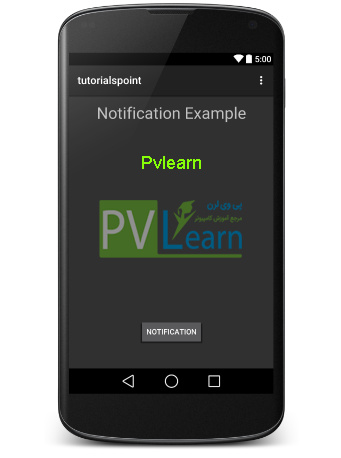
Notification در اندروید تست-۱
حالا روی button کلیک کنید، در بالای یک پیام “New Message Alert!” را مشاهده خواهید کرد.
این اطلاعیه لحظه ای نمایش داده می شود و پس از آن شما صفحه زیر را با یک آیکون کوچک در گوشه سمت چپ بالا خواهید داشت.
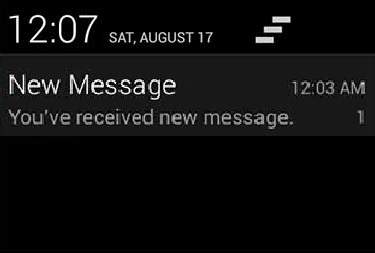
اطلاعیه در اندروید تست-۲
notification نمای بزرگ
قطعه کد زیر نشان می دهد که چگونه می توانید اعلان ایجاد شده در قطعه قبلی را تغییر دهید تا از سبک Inbox big استفاده کنید.
در ادامه متد اصلاح شده ی () displayNotification را برای نمایش این قابلیت به روزرسانی می کنیم:
مثال :
1 2 3 4 5 6 7 8 9 10 11 12 13 14 15 16 17 18 19 20 21 22 23 24 25 26 27 28 29 30 31 32 33 34 35 36 37 38 39 40 41 42 43 44 45 46 47 48 49 50 51 | protected void displayNotification() { Log.i("Start", "notification"); /* Invoking the default notification service */ NotificationCompat.Builder mBuilder = new NotificationCompat.Builder(this); mBuilder.setContentTitle("New Message"); mBuilder.setContentText("You've received new message."); mBuilder.setTicker("New Message Alert!"); mBuilder.setSmallIcon(R.drawable.woman); /* Increase notification number every time a new notification arrives */ mBuilder.setNumber(++numMessages); /* Add Big View Specific Configuration */ NotificationCompat.InboxStyle inboxStyle = new NotificationCompat.InboxStyle(); String[] events = new String[6]; events[0] = new String("This is first line...."); events[1] = new String("This is second line..."); events[2] = new String("This is third line..."); events[3] = new String("This is 4th line..."); events[4] = new String("This is 5th line..."); events[5] = new String("This is 6th line..."); // Sets a title for the Inbox style big view inboxStyle.setBigContentTitle("Big Title Details:"); // Moves events into the big view for (int i=0; i < events.length; i++) { inboxStyle.addLine(events[i]); } mBuilder.setStyle(inboxStyle); /* Creates an explicit intent for an Activity in your app */ Intent resultIntent = new Intent(this, NotificationView.class); TaskStackBuilder stackBuilder = TaskStackBuilder.create(this); stackBuilder.addParentStack(NotificationView.class); /* Adds the Intent that starts the Activity to the top of the stack */ stackBuilder.addNextIntent(resultIntent); PendingIntent resultPendingIntent =stackBuilder.getPendingIntent(0,PendingIntent.FLAG_UPDATE_CURRENT); mBuilder.setContentIntent(resultPendingIntent); mNotificationManager = (NotificationManager) getSystemService(Context.NOTIFICATION_SERVICE); /* notificationID allows you to update the notification later on. */ mNotificationManager.notify(notificationID, mBuilder.build()); } |
در حال حاضر اگر برنامه خود را اجرا کنید، نتیجه ی زیر را در فرم expanded مشاهده خواهید کرد:
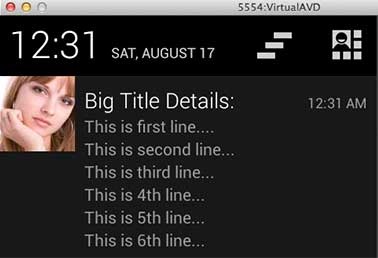
Notification در اندروید -تست نهایی
کلام آخر
Notification در اندروید به شما قابلیت نمایش اطلاعیه ها و اعلان های موقتی را در بالای صفحه نمایش می دهد، که برای نمایش اعلان های متفرقه ی برنامه به کاربر بسیار مفید است از این رو ما مباحث این بخش را به اطلاعیه در اندروید اختصاص دادیم.
 در اندروید")