مقدمه
با عرض سلام و وقت بخیر خدمت کاربران سایت پی وی لرن . و کاربرانی که دوره آموزش کامل Bootstrap 3 را دنبال می کنند. در آموزشهای پیشین دیدیم که عناصر Button در Bootstrap 3، طرح بندی ها و Style های متنوعی دارند که هر کدام برای عمل و فعالیت خاصی طراحی شده اند. اما در عین حل می توان برای فعالیت های پیچیده تر و تخصصی تر عناصر Button را با هم گروه بندی کرد. یا حتی ترکیبی از عناصر دیگر را نیز استفاده کرد. برای آشنایی بیشتر با مباحث گروه بندی عناصر Button در Bootstrap 3 در ادامه این آموزش با ما همراه باشید.
گروه بندی عناصر Button در Bootstrap 3
Bootstrap به شما اجازه می دهد که یک سری از عناصر Button را در یک خط با هم گروه بندی کنید.
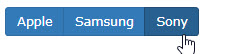
گروه بندی عناصر Button در Bootstrap 3
برای گروه بندی ساده ی عناصر Button کلاس .btn-group را به تگ <div> اضافه کنید.
مثال :
| <div class="btn-group"> <button type="button" class="btn btn-primary">Apple</button> <button type="button" class="btn btn-primary">Samsung</button> <button type="button" class="btn btn-primary">Sony</button> </div> |
نکته: به جای اینکه اندازه هر Button را بصورت تکی مشخص کنید. می توانید از کلاسهای .btn-group-lg|sm|xs برای مشخص کردن اندازه تمام عناصر Button استفاده کنید.
مثال :
| <div class="btn-group btn-group-lg"> <button type="button" class="btn btn-primary">Apple</button> <button type="button" class="btn btn-primary">Samsung</button> <button type="button" class="btn btn-primary">Sony</button> </div> |
گروه بندی عمودی عناصر Button
عناصر Button را می توان بصورت عمودی گروه بندی کرد.
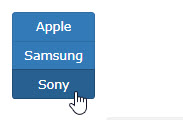
گروه بندی عمودی عناصر Button
برای گروه بندی عناصر Button بصورت عمودی از کلاس .btn-group-vertical استفاده کنید.
مثال:
مثال :
| <div class="btn-group-vertical"> <button type="button" class="btn btn-primary">Apple</button> <button type="button" class="btn btn-primary">Samsung</button> <button type="button" class="btn btn-primary">Sony</button> </div> |
گروه بندی Justified (متعادل)
برای گروه بندی متعادل Button از کلاس .btn-group-justified استفاده کنید.

گروه بندی Justified (متعادل)
روش استفاده از تگ <a> :
مثال :
| <div class="btn-group btn-group-justified"> <a href="#" class="btn btn-primary">Apple</a> <a href="#" class="btn btn-primary">Samsung</a> <a href="#" class="btn btn-primary">Sony</a> </div> |
نکته: باید تمام عناصر <button> را در عنصری با کلاس .btn-group قرار بدهید:
مثال :
| <div class="btn-group btn-group-justified"> <div class="btn-group"> <button type="button" class="btn btn-primary">Apple</button> </div> <div class="btn-group"> <button type="button" class="btn btn-primary">Samsung</button> </div> <div class="btn-group"> <button type="button" class="btn btn-primary">Sony</button> </div> </div> |
ترکیب گروه بندی Button و لیست کشویی dropdown
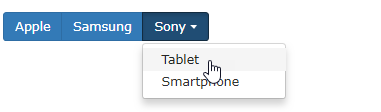
ترکیب گروه بندی Button و لیست کشویی dropdown
کد ترکیب گروه بندی Button و لیست کشویی dropdown:
مثال :
| <div class="btn-group"> <button type="button" class="btn btn-primary">Apple</button> <button type="button" class="btn btn-primary">Samsung</button> <div class="btn-group"> <button type="button" class="btn btn-primary dropdown-toggle" data-toggle="dropdown"> Sony <span class="caret"></span></button> <ul class="dropdown-menu" role="menu"> <li><a href="#">Tablet</a></li> <li><a href="#">Smartphone</a></li> </ul> </div> </div> |
ترکیب یک button با dropdown
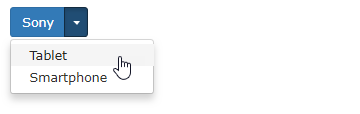
ترکیب یک button با dropdown
مثال:
مثال :
| <div class="btn-group"> <button type="button" class="btn btn-primary">Sony</button> <button type="button" class="btn btn-primary dropdown-toggle" data-toggle="dropdown"> <span class="caret"></span> </button> <ul class="dropdown-menu" role="menu"> <li><a href="#">Tablet</a></li> <li><a href="#">Smartphone</a></li> </ul> </div> |
کلام آخر
در این آموزش با چگونگی استفاده از گروه بندی ها ی مختلف در عناصر button آشنا شدید. همچنین چگونگی ترکیب سایر عناصرها را در عناصر button بصورت گروهی و تکی را بررسی کردیم. امیدواریم که از مباحث گروه بندی عناصر Button در Bootstrap 3 بخوبی استفاده کرده باشید.