مقدمه
با عرض سلام و وقت بخیر خدمت کاربران سایت پی وی لرن . و کاربرانی که دوره کامل آموزش برنامه نویسی اندروید را دنبال می کنند. یک پنجره ی Dialog پنجره ی کوچکی است که به کاربر امکان تصمیم گیری ، تایید و رد یک فعالیت را می دهد، همچنین می توانید آن را طوری تنظیم کنیم که از کاربر ورودی دریافت کند، پنجره ی Dialog در اندروید کاربردهای بسیار گسترده ای دارد که از جمله می توان به دریافت تایید از کاربر با ارائه دو گزینه ی بله یا خیر ، اعلام هشداری به کاربر با ارائه ی یک دکمه تایید بله و… اشاره کرد. در ادامه ی مباحث این بخش برای آشنایی بیشتر با چگونگی استفاده از پنجره ی دیالوگ در اندروید با ما همراه باشید.
پنجره ی Dialog در اندروید
در ادامه ی این آموزش شما را با ساختار و متدهای ایجاد و مدیریت پنجره ی دیالوگ در اندروید آشنا می کنیم.
برای ایجاد یک AlertDialog ، شما باید یک شی از AlertDialog Builder ایجاد کنید.
این شیء که یک کلاس داخلی از AlertDialog است. ساختار تعریف آن بصورت زیر است :
مثال :
| AlertDialog.Builder alertDialogBuilder = new AlertDialog.Builder(this); |
حالا شما باید دکمه مثبت (YES) یا منفی (NO) را با استفاده از شیء کلاس AlertDialogBuilder تنظیم کنید. که ساختار آن به صورت زیر است:
مثال :
| alertDialogBuilder.setPositiveButton(CharSequence text, DialogInterface.OnClickListener listener) alertDialogBuilder.setNegativeButton(CharSequence text, DialogInterface.OnClickListener listener) |
جدا از این، شما می توانید از توابع دیگر ارائه شده توسط کلاس سازنده برای سفارشی کردن AlertDialog استفاده کنید.
این توابع در زیر فهرست شده است :
| ردیف | نوع متد و توضیحات آن |
|---|
| ۱ | setIcon(Drawable icon) این متد برای تنظیم آیکون alert dialog است. |
| ۲ | setCancelable(boolean cancel able) این متد ویژگی قابل کنسل بودن را به alert dialog اضافه می کند. |
| ۳ | setMessage(CharSequence message) این متد پیامی که به کاربر نشان داده می شود را در alert dialog نمایش می دهد. |
| ۴ | setMultiChoiceItems(CharSequence[] items, boolean[] checkedItems, DialogInterface.OnMultiChoiceClickListener listener) این متد لیستی از مواردی را که در محاوره به عنوان محتوا نمایش داده می شود، تنظیم می کند. |
| ۵ | setOnCancelListener(DialogInterface.OnCancelListener onCancelListener) اگر dialog لغو شود این متد فرخوانی می شود. |
| ۶ | setTitle(CharSequence title) این متد عنوان را برای dialog تنظیم می کند. |
پس از تنظیم و ایجاد محاوره با فراخوانی متد () create می توان یک alert dialog طبق ساختار زیر ایجاد کرد:
مثال :
| AlertDialog alertDialog = alertDialogBuilder.create(); alertDialog.show(); |
این پنجره alert dialog را ایجاد می کند و آن را روی صفحه نمایش نشان می دهد.
dialog fragment
قبل از شروع مثال باید با dialog fragment.Dialog آشنا شویم، که یک fragment را در کارد محاوره نمایش می دهد:
مثال :
1 2 3 4 5 6 7 8 9 10 11 12 13 14 15 16 17 18 19 | public class DialogFragment extends DialogFragment { @Override public Dialog onCreateDialog(Bundle savedInstanceState) { // Use the Builder class for convenient dialog construction AlertDialog.Builder builder = new AlertDialog.Builder(getActivity()); builder.setPositiveButton(R.string.fire, new DialogInterface.OnClickListener() { public void onClick(DialogInterface dialog, int id) { toast.makeText(this,"enter a text here",Toast.LENTH_SHORT).show(); } }) .setNegativeButton(R.string.cancel, new DialogInterface.OnClickListener() { public void onClick(DialogInterface dialog, int id) { finish(); }); return builder.create(); } } } |
List dialog
این قابلیت برای نمایش آیتم ها در dialog box استفاده می شود، این قابلیت به کاربر امکان انتخاب آیتم در dialog box را می دهد:
مثال :
| public Dialog onCreateDialog(Bundle savedInstanceState) { AlertDialog.Builder builder = new AlertDialog.Builder(getActivity()); builder.setTitle(Pick a Color) .setItems(R.array.colors_array, new DialogInterface.OnClickListener() { public void onClick(DialogInterface dialog, int which) { } }); return builder.create(); } |
لیست انتخابی تک گزینه ای پنجره ی دیالوگ در اندروید
این قابلیت استفاده شده است برای افزودن لیست انتخاب مجدد به جعبه محاوره. ما می توانیم به عنوان انتخاب هر کاربر را بررسی و یا چک کنیم:
مثال :
1 2 3 4 5 6 7 8 9 10 11 12 13 14 15 16 17 18 19 20 21 22 23 24 25 26 27 28 29 30 31 32 33 34 35 36 37 38 39 40 | public Dialog onCreateDialog(Bundle savedInstanceState) { mSelectedItems = new ArrayList(); AlertDialog.Builder builder = new AlertDialog.Builder(getActivity()); builder.setTitle("This is list choice dialog box"); .setMultiChoiceItems(R.array.toppings, null, new DialogInterface.OnMultiChoiceClickListener() { @Override public void onClick(DialogInterface dialog, int which, boolean isChecked) { if (isChecked) { // If the user checked the item, add it to the selected items mSelectedItems.add(which); } else if (mSelectedItems.contains(which)) { // Else, if the item is already in the array, remove it mSelectedItems.remove(Integer.valueOf(which)); } } }) // Set the action buttons .setPositiveButton(R.string.ok, new DialogInterface.OnClickListener() { @Override public void onClick(DialogInterface dialog, int id) { // User clicked OK, so save the mSelectedItems results somewhere // or return them to the component that opened the dialog ... } }) .setNegativeButton(R.string.cancel, new DialogInterface.OnClickListener() { @Override public void onClick(DialogInterface dialog, int id) { ... } }); return builder.create(); } |
مثال
مثال زیر چگونگی استفاده از AlertDialog برای ایجاد یک پنجره ی پنجره ی Dialog در اندروید را نشان می دهد.
برای آزمایش این مثال، شما باید این را در یک شبیه ساز یا یک دستگاه واقعی اندروید اجرا کنید.
| مراحل | تضیحات |
|---|
| ۱ | مراحل ایجاد برنامه در اندروید استدیو را طبق بخش های قبلی دنبال کرده و نام پکیج را com.pvlearn.pvlearn.myapplication قرار بدهید. |
| ۲ | به محتوای فایل src/MainActivity.java کدهای اجرای AlertDialog را اضافه کنید. |
| ۳ | به محتوای فایل res/layout/activity_main.xml رابط کاربری مناسب را اضافه کنید. |
| ۴ | نیازی به تغییر محتوای فایل values/string.xml نیست. |
| ۵ | برنامه را اجرا کنید تا شبیه ساز اندروید نتیجه را نمایش دهد. |
محتوای فایل src/MainActivity.java را به صورت زیر تنظیم کنید:
مثال :
1 2 3 4 5 6 7 8 9 10 11 12 13 14 15 16 17 18 19 20 21 22 23 24 25 26 27 28 29 30 31 32 33 34 35 36 37 38 39 40 | package com.example.Pvlearn.myapplication; import android.app.AlertDialog; import android.content.DialogInterface; import android.support.v7.app.ActionBarActivity; import android.os.Bundle; import android.view.View; import android.widget.Toast; public class MainActivity extends ActionBarActivity { @Override protected void onCreate(Bundle savedInstanceState) { super.onCreate(savedInstanceState); setContentView(R.layout.activity_main); } public void open(View view){ AlertDialog.Builder alertDialogBuilder = new AlertDialog.Builder(this); alertDialogBuilder.setMessage("Are you sure, You wanted to make decision"); alertDialogBuilder.setPositiveButton("yes", new DialogInterface.OnClickListener() { @Override public void onClick(DialogInterface arg0, int arg1) { Toast.makeText(MainActivity.this,"You clicked yes button",Toast.LENGTH_LONG).show(); } }); alertDialogBuilder.setNegativeButton("No",new DialogInterface.OnClickListener() { Override public void onClick(DialogInterface dialog, int which) { finish(); } }); AlertDialog alertDialog = alertDialogBuilder.create(); alertDialog.show(); } } |
محتوای فایل res/layout/activity_main.xml نیز را به صورت زیر ویرایش کنید:
مثال :
1 2 3 4 5 6 7 8 9 10 11 12 13 14 15 16 17 18 19 20 21 22 23 24 25 26 27 28 29 30 31 32 33 34 35 36 37 38 39 40 41 42 43 44 45 46 47 48 49 50 51 52 53 54 | <?xml version="1.0" encoding="utf-8"?> <RelativeLayout xmlns:android="http://schemas.android.com/apk/res/android" xmlns:tools="http://schemas.android.com/tools" android:layout_width="match_parent" android:layout_height="match_parent" android:paddingLeft="@dimen/activity_horizontal_margin" android:paddingRight="@dimen/activity_horizontal_margin" android:paddingTop="@dimen/activity_vertical_margin" android:paddingBottom="@dimen/activity_vertical_margin" tools:context=".MainActivity"> <TextView android:layout_width="wrap_content" android:layout_height="wrap_content" android:text="Alert Dialog" android:id="@+id/textView" android:textSize="35dp" android:layout_alignParentTop="true" android:layout_centerHorizontal="true" /> <TextView android:layout_width="wrap_content" android:layout_height="wrap_content" android:text="Tutorialspoint" android:id="@+id/textView2" android:textColor="#ff3eff0f" android:textSize="35dp" android:layout_below="@+id/textView" android:layout_centerHorizontal="true" /> <ImageView android:layout_width="wrap_content" android:layout_height="wrap_content" android:id="@+id/imageView" android:src="@drawable/abc" android:layout_below="@+id/textView2" android:layout_alignRight="@+id/textView2" android:layout_alignEnd="@+id/textView2" android:layout_alignLeft="@+id/textView" android:layout_alignStart="@+id/textView" /> <Button android:layout_width="wrap_content" android:layout_height="wrap_content" android:text="Alert dialog" android:id="@+id/button" android:layout_below="@+id/imageView" android:layout_alignRight="@+id/textView2" android:layout_alignEnd="@+id/textView2" android:layout_marginTop="42dp" android:onClick="open" android:layout_alignLeft="@+id/imageView" android:layout_alignStart="@+id/imageView" /> </RelativeLayout> |
محتوای فایل Strings.xml بصورت زیر است:
مثال :
| <resources> <string name="app_name">My Application</string> </resources> |
کد پیش فرض فایل AndroidManifest.xml بصورت زیر خواهد بود:
مثال :
1 2 3 4 5 6 7 8 9 10 11 12 13 14 15 16 17 18 19 20 21 22 23 | <?xml version="1.0" encoding="utf-8"?> <manifest xmlns:android="http://schemas.android.com/apk/res/android" package="com.example.Pvlearn.myapplication" > <application android:allowBackup="true" android:icon="@drawable/ic_launcher" android:label="@string/app_name" android:theme="@style/AppTheme" > <activity android:name="com.example.Pvlearn.myapplication.MainActivity" android:label="@string/app_name" > <intent-filter> <action android:name="android.intent.action.MAIN" /> <category android:name="android.intent.category.LAUNCHER" /> </intent-filter> </activity> </application> </manifest> |
اجرای برنامه
برای اجرای برنامه ی اندرویدی خود یکی از فایل های activity در برنامه ی خود کلیک کنید.
سپس روی نماد  (Run) از نوار ابزار برای شروع اجرای برنامه کلیک کنید.
سپس نتیجه را به صورت زیر مشاهده خواهید کرد:
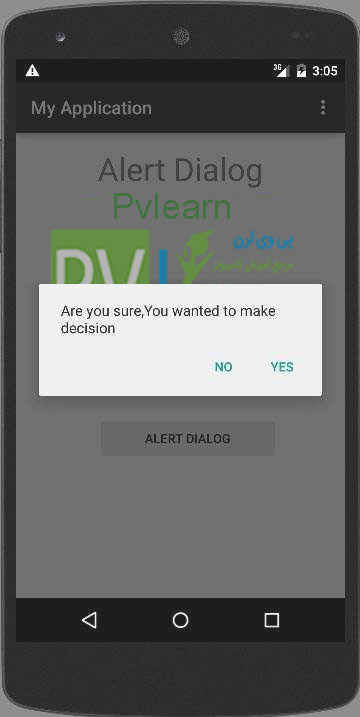
پنجره ی Dialog در اندروید
روی یکی از گزینه های yes یا no کلیک کنید، به عنوان مثال روی yes برای مشاهده ی خروجی زیر کلیک می کنیم:
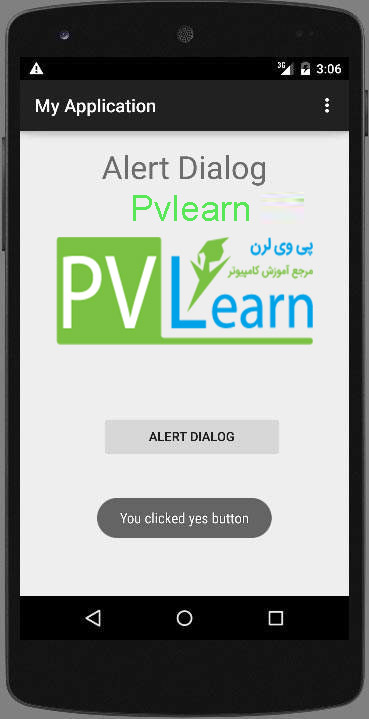
پنجره ی Dialog در اندروید-
تست-۲
اگر روی هیچکدام از Button ها کلیک نکنید، تابع () finish فراخوانی شده و برنامه بسته می شود.
کلام آخر
در اغلب برنامه های کاربردی و اپلیکیشن های اندروید حتما به نمایش یک پنجره ی Dialog برای اعلام به کاربر و فراهم کردن قابلیت انتخاب ، نیاز خواهی داشت قابلیت پنجره ی Dialog در اندروید این نیاز را به خوبی برطرف می کند، از این رو مباحث این بخش را به آموزش کار با پنجره ی دیالوگ در اندروید اختصاص دادیم.
 در اندروید")


نیکان
سلام
من اگر بخواهم در یک دیالوگ بنر نیتیو (بنر همسان ) نمایش دهم چطور می توان در دیالوگ متد مربوط به بنر را فراخوانی کرد؟