مقدمه
با عرض سلام و وقت بخیر خدمت کاربران سایت پی وی لرن . و کاربرانی که دوره کامل آموزش برنامه نویسی اندروید را دنبال می کنند. گاهی نیاز است که شما در برنامه ی اندرویدی خود از یک سرویس ارسال sms به کاربران مختلف استفاده کنید. برای این منظور قابلیت ارسال اس ام اس در اندروید همانند قابلیت ارسال ایمیل در دسترس قرار گرفته تا برنامه نویسان بتوانند در صورت لزوم از آن در برنامه ی خود استفاده نمایند. در Android، شما می توانید از API SmsManager یا دستگاه های ساخته شده در برنامه SMS برای ارسال اس ام اس در اندروید استفاده کنید. در ادامه ی مباحث این آموزش جهت آشنایی با چگونگی ارسال sms در اندروید با ما همراه باشید.
آشنایی با ارسال sms در اندروید
در ادامه ی آموزش ها ما شما را با API ارسال اس ام اس در اندروید و یک مثال ساده در این زمینه آشنا می کنیم.
در ادامه ی آموزش ما دو نمونه ی API پایه برای ارسال sms در اندروید به شما معرفی می کنیم.
SmsManager API
ساختار :
مثال :
| SmsManager smsManager = SmsManager.getDefault(); smsManager.sendTextMessage("phoneNo", null, "sms message", null, null); |
Built-in SMS application
ساختار:
مثال :
| Intent sendIntent = new Intent(Intent.ACTION_VIEW); sendIntent.putExtra("sms_body", "default content"); sendIntent.setType("vnd.android-dir/mms-sms"); startActivity(sendIntent); |
البته هر دو مورد به SEND_SMS permission نیاز دارند:
مثال :
| <uses-permission android:name="android.permission.SEND_SMS" /> |
به غیر از متد فوق، چند تابع مهم دیگر در کلاس SmsManager وجود دارد. این متد ها در زیر فهرست شده است:
| ردیف | متد و توضیحات |
|---|
| ۱ | ArrayList<String> divideMessage(String text) این متد متن پیام را به چند قطعه تقسیم می کند، که هیچ کدام بزرگتر از حداکثر اندازه پیام SMS نیست. |
| ۲ | static SmsManager getDefault() این متد برای دریافت مثال پیش فرض SmsManager استفاده می شود. |
| ۳ | void sendDataMessage(String destinationAddress, String scAddress, short destinationPort, byte[] data, PendingIntent sentIntent, PendingIntent deliveryIntent) از این متد برای ارسال داده در قالب SMS به پورت مشخص اپلیکیشن استفاده می شود. |
| ۴ | void sendMultipartTextMessage(String destinationAddress, String scAddress, ArrayList<String> parts, ArrayList<PendingIntent> sentIntents, ArrayList<PendingIntent> deliveryIntents) ارسال یک متن چند بخشی در قالب SMS . |
| ۵ | void sendTextMessage(String destinationAddress, String scAddress, String text, PendingIntent sentIntent, PendingIntent deliveryIntent) ارسال یک متن در قالب SMS . |
مثال
مثال زیر به شما نحوه استفاده از شی SmsManager برای ارسال اس ام اس به شماره تلفن همراه داده شده را نشان می دهد:
نکته -۱: برای تست این مثال شما نیاز به یک دستگاه اندروید واقعی دارید چراکه ممکن است شبیه ساز اندروید به خوبی کار نکند.
مراحل اجرای برنامه
| مراحل | توضیحات |
|---|
| ۱ | مراحل ایجاد برنامه در اندروید استدیو را طبق بخش های قبلی دنبال کرده و نام پکیج را com.pvlearn.myapplication قرار بدهید. |
| ۲ | کد مورد نیاز برای ارسال اس ام اس در اندروید را به محتوای فایل src/MainActivity.java اضافه کنید. |
| ۳ | در محتوای فایل res / layout / activity_main.xml کد مورد نیاز برای افزودن یک رابط کاربری ساده دریافت شماره تلفن و متن اس ام اس و یک دکمه برای ارسال اس ام اس را اضافه کنید. |
| ۴ | رشته های ثابت را به res/values/strings.xml اضافه کنید. |
| ۵ | محتوای فایل AndroidManifest.xml را بصورتی که در ادامه اشاره کرده ایم تغییر دهید. |
| ۶ | برنامه را اجرا کنید تا شبیه ساز اندروید نتیجه را نمایش دهد. |
محتوای فایل main activity که در مسیر src/com.example.Pvlearn/MainActivity.java قرار دارد بصورت زیر خواهد بود:
مثال :
1 2 3 4 5 6 7 8 9 10 11 12 13 14 15 16 17 18 19 20 21 22 23 24 25 26 27 28 29 30 31 32 33 34 35 36 37 38 39 40 41 42 43 44 45 46 47 48 49 50 51 52 53 54 55 56 57 58 59 60 61 62 63 64 65 66 67 68 69 70 71 72 73 74 75 76 77 78 79 80 | package com.example.Pvlearn; import android.Manifest; import android.content.pm.PackageManager; import android.os.Bundle; import android.app.Activity; import android.support.v4.app.ActivityCompat; import android.support.v4.content.ContextCompat; import android.telephony.SmsManager; import android.util.Log; import android.view.Menu; import android.view.View; import android.widget.Button; import android.widget.EditText; import android.widget.Toast; public class MainActivity extends Activity { private static final int MY_PERMISSIONS_REQUEST_SEND_SMS =0 ; Button sendBtn; EditText txtphoneNo; EditText txtMessage; String phoneNo; String message; @Override protected void onCreate(Bundle savedInstanceState) { super.onCreate(savedInstanceState); setContentView(R.layout.activity_main); sendBtn = (Button) findViewById(R.id.btnSendSMS); txtphoneNo = (EditText) findViewById(R.id.editText); txtMessage = (EditText) findViewById(R.id.editText2); sendBtn.setOnClickListener(new View.OnClickListener() { public void onClick(View view) { sendSMSMessage(); } }); } protected void sendSMSMessage() { phoneNo = txtphoneNo.getText().toString(); message = txtMessage.getText().toString(); if (ContextCompat.checkSelfPermission(this, Manifest.permission.SEND_SMS) != PackageManager.PERMISSION_GRANTED) { if (ActivityCompat.shouldShowRequestPermissionRationale(this, Manifest.permission.SEND_SMS)) { } else { ActivityCompat.requestPermissions(this, new String[]{Manifest.permission.SEND_SMS}, MY_PERMISSIONS_REQUEST_SEND_SMS); } } } @Override public void onRequestPermissionsResult(int requestCode,String permissions[], int[] grantResults) { switch (requestCode) { case MY_PERMISSIONS_REQUEST_SEND_SMS: { if (grantResults.length > 0 && grantResults[0] == PackageManager.PERMISSION_GRANTED) { SmsManager smsManager = SmsManager.getDefault(); smsManager.sendTextMessage(phoneNo, null, message, null, null); Toast.makeText(getApplicationContext(), "SMS sent.", Toast.LENGTH_LONG).show(); } else { Toast.makeText(getApplicationContext(), "SMS faild, please try again.", Toast.LENGTH_LONG).show(); return; } } } } } |
محتوای فایل res/layout/activity_main.xml بصورت زیر خواهد بود:
مثال :
1 2 3 4 5 6 7 8 9 10 11 12 13 14 15 16 17 18 19 20 21 22 23 24 25 26 27 28 29 30 31 32 33 34 35 36 37 38 39 40 41 42 43 44 45 46 47 48 49 50 51 52 53 54 55 56 57 58 59 60 61 62 63 64 65 66 67 68 69 70 71 | <?xml version="1.0" encoding="utf-8"?> <RelativeLayout xmlns:android="http://schemas.android.com/apk/res/android" xmlns:tools="http://schemas.android.com/tools" android:layout_width="match_parent" android:layout_height="match_parent" android:paddingBottom="@dimen/activity_vertical_margin" android:paddingLeft="@dimen/activity_horizontal_margin" android:paddingRight="@dimen/activity_horizontal_margin" android:paddingTop="@dimen/activity_vertical_margin" tools:context="MainActivity"> <TextView android:id="@+id/textView1" android:layout_width="wrap_content" android:layout_height="wrap_content" android:text="Sending SMS Example" android:layout_alignParentTop="true" android:layout_centerHorizontal="true" android:textSize="30dp" /> <TextView android:id="@+id/textView2" android:layout_width="wrap_content" android:layout_height="wrap_content" android:text="Tutorials point " android:textColor="#ff87ff09" android:textSize="30dp" android:layout_below="@+id/textView1" android:layout_alignRight="@+id/imageButton" android:layout_alignEnd="@+id/imageButton" /> <ImageButton android:layout_width="wrap_content" android:layout_height="wrap_content" android:id="@+id/imageButton" android:src="@drawable/abc" android:layout_below="@+id/textView2" android:layout_centerHorizontal="true" /> <EditText android:layout_width="wrap_content" android:layout_height="wrap_content" android:id="@+id/editText" android:hint="Enter Phone Number" android:phoneNumber="true" android:textColorHint="@color/abc_primary_text_material_dark" android:layout_below="@+id/imageButton" android:layout_centerHorizontal="true" /> <EditText android:layout_width="wrap_content" android:layout_height="wrap_content" android:id="@+id/editText2" android:layout_below="@+id/editText" android:layout_alignLeft="@+id/editText" android:layout_alignStart="@+id/editText" android:textColorHint="@color/abc_primary_text_material_dark" android:layout_alignRight="@+id/imageButton" android:layout_alignEnd="@+id/imageButton" android:hint="Enter SMS" /> <Button android:layout_width="wrap_content" android:layout_height="wrap_content" android:text="Send Sms" android:id="@+id/btnSendSMS" android:layout_below="@+id/editText2" android:layout_centerHorizontal="true" android:layout_marginTop="48dp" /> </RelativeLayout> |
محتوای فایل res/values/strings.xml نیز به صورت زیر خواهد بود:
مثال :
| <?xml version="1.0" encoding="utf-8"?> <resources> <string name="app_name">tutorialspoint</string> </resources> |
محتوای فایل AndroidManifest.xml نیز به صورت زیر خواهد بود:
مثال :
1 2 3 4 5 6 7 8 9 10 11 12 13 14 15 16 17 18 19 20 21 22 23 24 25 | <?xml version="1.0" encoding="utf-8"?> <manifest xmlns:android="http://schemas.android.com/apk/res/android" package="com.example.Pvlearn" > <uses-permission android:name="android.permission.SEND_SMS" /> <application android:allowBackup="true" android:icon="@drawable/ic_launcher" android:label="@string/app_name" android:theme="@style/AppTheme" > <activity android:name="com.example.Pvlearn.MainActivity" android:label="@string/app_name" > <intent-filter> <action android:name="android.intent.action.MAIN" /> <category android:name="android.intent.category.LAUNCHER" /> </intent-filter> </activity> </application> </manifest> |
اجرای برنامه
برای اجرای برنامه ی اندرویدی خود یکی از فایل های activity در برنامه ی خود کلیک کنید.
سپس روی نماد  (Run) از نوار ابزار برای شروع اجرای برنامه کلیک کنید.
اگر همه چیز بخوبی پیش برود شبیه ساز اندروید پنجره ی زیر را نمایش خواهد داد:

ارسال sms در اندروید -تست برنامه
اکنون می توانید شماره تلفن همراه مورد نظر را وارد کرده و متن اسم ام اس مورد نظر را به آن شماره را تایپ کنید.
در نهایت برای ارسال اس ام اس روی دکمه Send SMS کلیک کنید.
مطمئن شوید که GSM / CDMA به خوبی برای ارسال پیام کوتاه به گیرنده شما کار می کند.
همچنین شما می توانید چنیدن اس ام اس را به شماره های مختلف به صورت زیر ارسال کنید:
- اس ام اس های مورد نظر را تایپ نموده و هر کدام را با کاما از دیگری تفکیک کنید.
- شماره تلفن های مورد نظر را نیز با کاما از یکدیگر جدا کنید.
استفاده از built-in SMS برای ارسال اس ام اس در اندروید
شما می توانید از Android Intent برای ارسال SMS با استفاده از قابلیت های اس ام اس های داخلی آندروید استفاده کنید.
بخش زیر بخش های مختلفی از شیء Intent را برای ارسال یک پیامک را توضیح می دهد:
آبجکت Intent – عمل ارسال ایمیل
شما عمل ACTION_VIEW را برای راه اندازی یک سرویس پیام کوتاه نصب شده در دستگاه اندرویدی خود خواهید داشت.
در زیر روش ساده ای برای ایجاد یک Intent با عمل ACTION_VIEW نشان می دهد.
مثال :
| Intent smsIntent = new Intent(Intent.ACTION_VIEW); |
آبجکت Intent -نوع داده برای ارسال sms در اندروید
آندروید دارای پشتیبانی داخلی برای اضافه کردن شماره تلفن و پیام متنی برای ارسال SMS به صورت زیر است:
مثال :
| smsIntent.putExtra("address" , new String("0123456789;3393993300")); smsIntent.putExtra("sms_body" , "Test SMS to Angilla"); |
در اینجا آدرس و sms_body حساس به حروف هستند و باید فقط در کاراکترهای کوچک مشخص شوند.
شما می توانید بیش از یک شماره را در رشته تکی مشخص کنید اما با سم کولون (؛) آن ها را جدا کنید.
مثال
مثال زیر چگونگی استفاده از شی Intent را برای راه اندازی سرویس SMS برای ارسال SMS به گیرندگان داده شده را نشان می دهد:
برای تست این مثال شما نیاز به استفاده از یک دستگاه اندروید واقعی دارید چون ممکن است شبیه ساز اندروید به خوبی کار نکند.
مراحل اجرای مثال:
| مراحل | توضیحات |
|---|
| ۱ | مراحل ایجاد برنامه در اندروید استدیو را طبق بخش های قبلی دنبال کرده و نام پکیج را com.pvlearn.pvlearn.myapplication قرار بدهید. |
| ۲ | به محتوای فایل src/MainActivity.java کد مورد نیاز برای ارسال اس ام اس را اضافه کنید. |
| ۳ | محتوای فایل res / layout / activity_main.xml را برای افزودن یک دکمه ساده ویرایش کنید. |
| ۴ | ثابت های رشته ای را تغییر ندهید. |
| ۵ | محتوای فایل AndroidManifest.xml را همانطور که در ادامه اشاره می کنیم تغییر دهید. |
| ۶ | برنامه را اجرا کنید تا شبیه ساز اندروید نتیجه را نمایش دهد. |
محتوای فایل main activity که در مسیر src/com.example.Pvlearn/MainActivity.java قرار دارد به صورت زیر خواهد بود :
مثال :
1 2 3 4 5 6 7 8 9 10 11 12 13 14 15 16 17 18 19 20 21 22 23 24 25 26 27 28 29 30 31 32 33 34 35 36 37 38 39 40 41 42 43 44 45 46 47 48 49 50 51 52 | package com.example.Pvlearn; import android.net.Uri; import android.os.Bundle; import android.app.Activity; import android.content.Intent; import android.util.Log; import android.view.Menu; import android.view.View; import android.widget.Button; import android.widget.Toast; public class MainActivity extends Activity { @Override protected void onCreate(Bundle savedInstanceState) { super.onCreate(savedInstanceState); setContentView(R.layout.activity_main); Button startBtn = (Button) findViewById(R.id.button); startBtn.setOnClickListener(new View.OnClickListener() { public void onClick(View view) { sendSMS(); } }); } protected void sendSMS() { Log.i("Send SMS", ""); Intent smsIntent = new Intent(Intent.ACTION_VIEW); smsIntent.setData(Uri.parse("smsto:")); smsIntent.setType("vnd.android-dir/mms-sms"); smsIntent.putExtra("address" , new String ("01234")); smsIntent.putExtra("sms_body" , "Test "); try { startActivity(smsIntent); finish(); Log.i("Finished sending SMS...", ""); } catch (android.content.ActivityNotFoundException ex) { Toast.makeText(MainActivity.this, "SMS faild, please try again later.", Toast.LENGTH_SHORT).show(); } } @Override public boolean onCreateOptionsMenu(Menu menu) { // Inflate the menu; this adds items to the action bar if it is present. getMenuInflater().inflate(R.menu.main, menu); return true; } } |
محتوای فایل طراحی که در مسیر res/layout/activity_main.xml قرار دارد نیز به صورت زیر است:
مثال :
1 2 3 4 5 6 7 8 9 10 11 12 13 14 15 16 17 18 19 20 21 22 23 24 25 26 27 28 29 30 31 32 33 34 35 36 37 38 39 40 41 42 43 44 45 46 47 48 49 50 51 52 | <?xml version="1.0" encoding="utf-8"?> <RelativeLayout xmlns:android="http://schemas.android.com/apk/res/android" xmlns:tools="http://schemas.android.com/tools" android:layout_width="match_parent" android:layout_height="match_parent" android:paddingLeft="@dimen/activity_horizontal_margin" android:paddingRight="@dimen/activity_horizontal_margin" android:paddingTop="@dimen/activity_vertical_margin" android:paddingBottom="@dimen/activity_vertical_margin" tools:context=".MainActivity"> <TextView android:layout_width="wrap_content" android:layout_height="wrap_content" android:text="Drag and Drop Example" android:id="@+id/textView" android:layout_alignParentTop="true" android:layout_centerHorizontal="true" android:textSize="30dp" /> <TextView android:layout_width="wrap_content" android:layout_height="wrap_content" android:text="Tutorials Point " android:id="@+id/textView2" android:layout_below="@+id/textView" android:layout_centerHorizontal="true" android:textSize="30dp" android:textColor="#ff14be3c" /> <ImageView android:layout_width="wrap_content" android:layout_height="wrap_content" android:id="@+id/imageView" android:src="@drawable/abc" android:layout_marginTop="48dp" android:layout_below="@+id/textView2" android:layout_centerHorizontal="true" /> <Button android:layout_width="wrap_content" android:layout_height="wrap_content" android:text="Compose SMS" android:id="@+id/button" android:layout_below="@+id/imageView" android:layout_alignRight="@+id/textView2" android:layout_alignEnd="@+id/textView2" android:layout_marginTop="54dp" android:layout_alignLeft="@+id/imageView" android:layout_alignStart="@+id/imageView" /> </RelativeLayout> |
محتوای فایل res/values/strings.xml نیز به صورت زیر است:
مثال :
| <?xml version="1.0" encoding="utf-8"?> <resources> <string name="app_name">tutorialspoint</string> </resources> |
محتوای پیش فرض فایل AndroidManifest.xml:
مثال :
1 2 3 4 5 6 7 8 9 10 11 12 13 14 15 16 17 18 19 20 21 22 23 | <?xml version="1.0" encoding="utf-8"?> <manifest xmlns:android="http://schemas.android.com/apk/res/android" package="com.example.Pvlearn" > <application android:allowBackup="true" android:icon="@drawable/ic_launcher" android:label="@string/app_name" android:theme="@style/AppTheme" > <activity android:name="com.example.Pvlearn.MainActivity" android:label="@string/app_name" > <intent-filter> <action android:name="android.intent.action.MAIN" /> <category android:name="android.intent.category.LAUNCHER" /> </intent-filter> </activity> </application> </manifest> |
اجرای برنامه
برای اجرای برنامه ی اندرویدی خود یکی از فایل های activity در برنامه ی خود کلیک کنید.
سپس روی نماد (Run) از نوار ابزار برای شروع اجرای برنامه کلیک کنید.
سپس استودیو آندروید پنجره زیر را برای انتخاب یک گزینه که در آن شما می خواهید برنامه Android خود را اجرا کنید نشان می دهد:
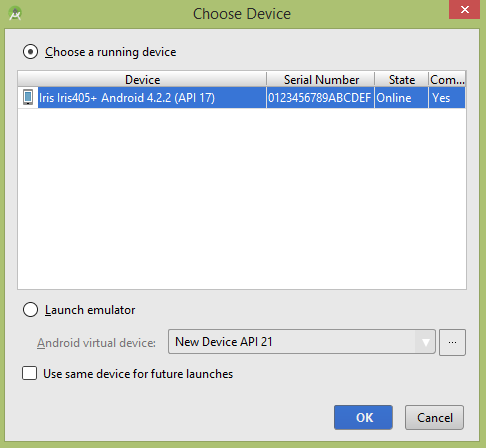
ارسال sms در اندروید
در گزینه های پنجره ی فوق دستگاه تلفن همراه خود را انتحاب کنید، سپس نتیجه زیر را مشاهد خواهید کرد:

ارسال اس ام اس در اندروید -تست
اکنون از دکمه ی Compose SMS برای اجرای built-in SMS بصورت زیر استفاده کنید:
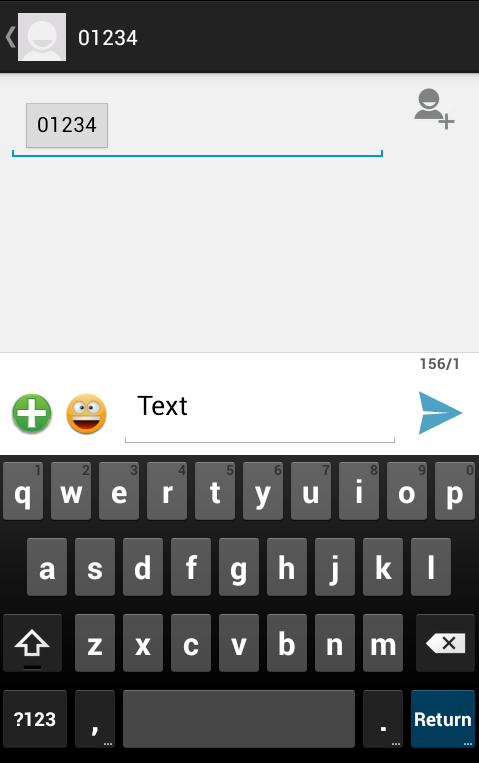
ارسال اس ام اس در اندروید -تست -۲
شما می توانید هر یک از فیلدهای پیش فرض را تغییر داده و در نهایت برای ارسال اس ام اس روی دکمه ی send SMS کلیک کنید.
کلام آخر
بسته به برنامه ی کاربردی که در اندروید ایجاد می کنید ممکن است که شما نیاز داشته باشید که از یک سرویس ارسال sms برای ایجاد قابلیت ارسال پیامک به کاربران مختلف استفاده کنید. از این رو مباحث این بخش را به ارسال اس ام اس در اندروید اختصاص داده ایم.