مقدمه
با عرض سلام و وقت بخیر خدمت کاربران سایت پی وی لرن . و کاربرانی که دوره کامل آموزش ASP.NET MVC ، را دنبال می کنند. در مباحث بخش های قبل ما StudentController, model و view را جداگانه ایجاد کردیم. اما برای اجرا باید آن ها را به هم متصل کنیم. در این آموزش یاد خواهید گرفت که چه طور با ادغام Controller, View و Model در ASP.NET MVC از ویژگی های آن ها در تکمیل بخشی از یک برنامه استفاده کنید.
ادغام Controller, View و Model در ASP.NET MVC
قطعه کد زیر کلاس StudentController و Student model و view را که در بخش های قبلی ایجاد کرده ایم را نشان می دهد:
مثال :
1 2 3 4 5 6 7 8 9 10 11 12 13 14 15 16 17 | using System; using System.Collections.Generic; using System.Linq; using System.Web; using System.Web.Mvc; namespace MVC_BasicTutorials.Controllers { public class StudentController : Controller { // GET: Student public ActionResult Index() { return View(); } } } |
مثال: کلاس مدل Student :
مثال :
| namespace MVC_BasicTutorials.Models { public class Student { public int StudentId { get; set; } public string StudentName { get; set; } public int Age { get; set; } } } |
مثال ۲ : استفاده از Index.cshtml برای نمایش لیست student :
مثال :
1 2 3 4 5 6 7 8 9 10 11 12 13 14 15 16 17 18 19 20 21 22 23 24 25 26 27 28 29 30 31 32 33 34 35 36 37 38 39 40 | @model IEnumerable<MVC_BasicTutorials.Models.Student> @{ ViewBag.Title = "Index"; Layout = "~/Views/Shared/_Layout.cshtml"; } <h2>Index</h2> <p> @Html.ActionLink("Create New", "Create") </p> <table class="table"> <tr> <th> @Html.DisplayNameFor(model => model.StudentName) </th> <th> @Html.DisplayNameFor(model => model.Age) </th> <th></th> </tr> @foreach (var item in Model) { <tr> <td> @Html.DisplayFor(modelItem => item.StudentName) </td> <td> @Html.DisplayFor(modelItem => item.Age) </td> <td> @Html.ActionLink("Edit", "Edit", new { id=item.StudentId }) | @Html.ActionLink("Details", "Details", new { id=item.StudentId }) | @Html.ActionLink("Delete", "Delete", new { id = item.StudentId }) </td> </tr> } </table> |
حالا برای اجرای موفقیت آمیز ما باید آبجکت مدل را از controller به نمایه متصل کنیم.
همانطور که می بینید در Index.cshtml فوق، IEnumerable از دانش آموز به عنوان یک شی مدل استفاده می کند.
ما نیاز داریم که IEnumerable مدل Student را از متد اجرایی کلاس StudentController نمایش دهیم:
مثال :
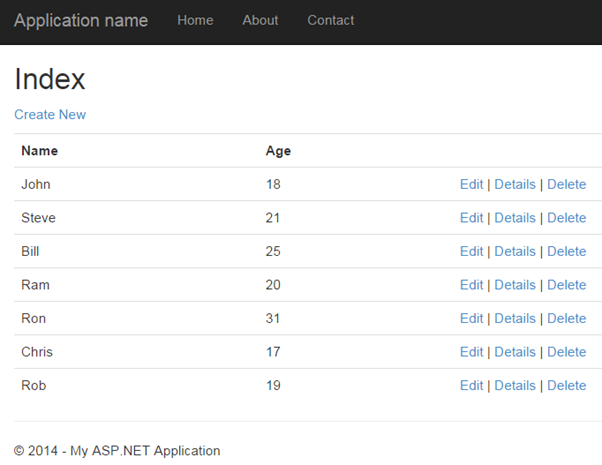
1 2 3 4 5 6 7 8 9 10 11 12 13 14 15 16 17 18 19 | public class StudentController : Controller { // GET: Student public ActionResult Index() { var studentList = new List<Student>{ new Student() { StudentId = 1, StudentName = "John", Age = 18 } , new Student() { StudentId = 2, StudentName = "Steve", Age = 21 } , new Student() { StudentId = 3, StudentName = "Bill", Age = 25 } , new Student() { StudentId = 4, StudentName = "Ram" , Age = 20 } , new Student() { StudentId = 5, StudentName = "Ron" , Age = 31 } , new Student() { StudentId = 4, StudentName = "Chris" , Age = 17 } , new Student() { StudentId = 4, StudentName = "Rob" , Age = 19 } }; // Get the students from the database in the real application return View(studentList); } } |
در مثال فوق ما یک لیست از آبجکت های دانش آموزان را ایجاد کرده ایم. سپس این لیست آبجکت ها را به عنوان پارامتر به متد ()View انتقال می دهیم.
متد ()View در کلاس کنترلر پایه تعریف شده است. که به طور خودکار آبجکت مدل را به نمایه متصل می کند.
اکنون می توانید با فشرن کلید F5 پروژه را اجرا کرده و به آدرس http://localhost/Student در مرورگر بروید.
سپس شما نمایه را در مرورگر خود مشاهده خواهید کرد.
کلام آخر
در این جلسه در تکمیل مباحث گفته شده ی چند جلسه قبل چگونگی ادغام Controller, View و Model در ASP.NET MVC را برای اجرای یک نمونه برنامه در ASP.NET MVC را بررسی کردیم. در آموزش بخش بعدی مدل اتصال (model binding) را بررسی می کنیم.